First of all I am over-reaching by calling this a ray-tracer, it is more appropriately called a "Splatter". I am simply projecting all the top-triangles in an OBJ model onto a raster for True Ortho generation purposes. It was a fun project for playing with Kd-trees and line-triangle intersections. The OBJ models are geo-referenced so it does not make sense to take them into a purely CG/Game oriented ray-tracer like Blender and lose the geographic context, as well as fiddle around with setting up orthographic cameras and render resolution to match ground-sampling distance. Doing it through a proper ray-tracer typically also requires setting up appropriate lighting, while I just want to sample the pre-exisiting texture in the model.
As usual a bit of googling located the python batteries that will perform the intersection as well as parse the obj mesh I have at hand. CGKit fits the bill perfectly both in terms of parsing as well as ray-triangle intersection.
However testing every triangle for intersection for every grid-cell quickly becomes horridly slow and begs for a hierarchial index to speed up the look-up and only process the triangles in the path of the ray. Here I picked up RTree to build a 3D index , a kD-Tree of Bounding volume hierarchy to speed up intersection testing.
After building the tree I went back to only testing relevant triangles in CGKit and dug through the parsed OBJ data structure to extract the texture co-ordinates of the intersected face. The barycentric description of the intersection point is sufficient to sample the texture for the right pixel colour and transfer it to the raster grid. For those interested in the implementation, the code follows, improvement suggestions are welcome. Multiprocessing is thrown in for tile-by-tile processing.
 |
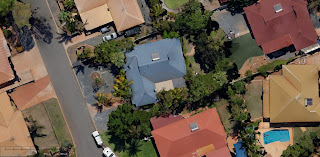
| Direct vertical projection render from script |
 |
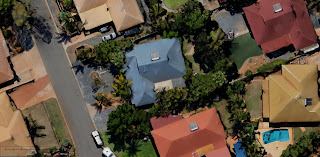
| Properly lit render using Terragen |
As usual a bit of googling located the python batteries that will perform the intersection as well as parse the obj mesh I have at hand. CGKit fits the bill perfectly both in terms of parsing as well as ray-triangle intersection.
However testing every triangle for intersection for every grid-cell quickly becomes horridly slow and begs for a hierarchial index to speed up the look-up and only process the triangles in the path of the ray. Here I picked up RTree to build a 3D index , a kD-Tree of Bounding volume hierarchy to speed up intersection testing.
After building the tree I went back to only testing relevant triangles in CGKit and dug through the parsed OBJ data structure to extract the texture co-ordinates of the intersected face. The barycentric description of the intersection point is sufficient to sample the texture for the right pixel colour and transfer it to the raster grid. For those interested in the implementation, the code follows, improvement suggestions are welcome. Multiprocessing is thrown in for tile-by-tile processing.
The point of the ray-tracer was to generate true-orthos for GIS use, as a side effect of implementing the ray tracer we can now generate true-orthos from both the top and the bottom of the model. The main article about true-orthos can be found here.


