Wednesday, December 7, 2016

Aliexpress DIN Rail Energy Meter teardown

The best way to learn is often by looking at solutions others have come up with. "Monkey see - monkey do" is pretty much part of the engineering process. While at University we wrote a top-scoring piece on how Apple scooped Creative in making a portable digital hard drive backed music player with great design and even greater marketing. When doing a tear down for inspiration and copying ideas always be wary of patents.

I am planning to move my ATM90E26 + Wireless Stack Energy monitor into a more industrial DIN rail format. To get an idea about how things are packaged inside a DIN rail energy monitor I ordered a no-patents cheap energy monitor with pulse output from AliExpress. The brand is Eastron, they also make quite affordable 3-phase versions which I am going to look at next.
DIN rail enclosure including wiring diagram
Once the meter arrived I did not even plug it in (in Australia an electrician will be required to properly install it due to the cutting of the live line to place a shunt and other modifications). I put a screw driver through the QC sticker, popped open the clipped on enclosure and proceeded to have a peek inside. What I found was a house of PCB's stacked around a transformer to make best use of the place inside the enclosure. The following labelled photos show the various parts.
Profile view with stacking

The stacking places the main processor board with AFE + MCU and LCD display on top, the transformer and associated carrier and high voltage safety stuff (Varistor and PPTC) at the base. The base PCB also carries the Live/Neutral connectors and a bulky current shunt. One vertical PCB is the power supply, voltage and current waveform sampler and the other is an isolated pulse and modbus output board (Modbus chip is unpopulated in my pulse only version).
Bottom view with safety components and current shunt
The voltage sampler uses a resistor ladder of 4x270K resistors in series with a relatively small voltage sampling resistor. The PCB is not heavy on expensive board to board connectors, which allows a modular system and swapping of boards, instead it relies of solder fingers on board edge to link the boxy shape together. The same board also carries the power supply module derived from a regulated full wave rectified output from the transformer. I am not sure if the transformer is isolating, it does not need to be since the isolation occurs at the end stage with a couple of optocouplers. The voltage sampler and the current shunt are obviously non-isolated.
LDO for dual voltage level output and 4 pads for 2 waveform signals
All the magic of actual energy monitoring then happens in the Vangotech V9811S with includes a 8052 MCU for driving the LCD and other functions such as Modbus support. I am planning to power it up with a 3.3V/5V supply and feed it waveforms from my low voltage AC test rig and observe the readings. I also have 3 phase version from Eastron on order and a few engineering samples from Vangotech for their 3 phase ASIC to build a low cost/ low voltage Dev kit like I did with the ATM90E26 Featherwing.
Anatomy of the head, MCU + AFE, EEPROM and an old school LCD

Wednesday, November 30, 2016

Adelaide Maker Faire 2016

Last Sunday (6th of November 2016) I spent almost the whole day on my feet talking to people at the Adelaide Maker Faire. It was a great event and I have been looking forward to it for almost a full year.

It took a bit of preparation in putting together a demo that would pass the electrical safety requirements and be tested and tagged. I chose to use a compact fluroscent lamp and a halogen lamp as my demo loads to illustrate the impact of power factor on energy measurements. The modern CFL's have notoriously low power-factor due to the uncompensated choke in them. I ended up making an earthed and a double insulated enclosure for my demo.
Earthed Test lamp box
Double insulated test lamp box


Earthed lamp fixture with Perspex lid

The main PCB on show was the Energy Monitor Featherwing with the ATM90E26 on-board. This does very quick and accurate measurements and I chose to send the data over serial to a laptop for graphing rather than use the rather crowded wifi and 3G environment at the faire. It also makes a more compelling demo since I can sample and display the power every second rather than every 15s with thingspeak (faster with workarounds still only down to 2s due to 8 channel limitation, must investigate running my personal Blynk or EmonCMS server).
ATM90E26 Low-voltage Energy Monitor (perspective view)

ATM90E26 Energy Monitor top view
My overall display was pretty minimalist since I focused on getting the hardware working rather than producing any marketing material. I ended up handing out notes written on the spot with my details on them. There was fair bit of interest and some people shared ideas with me on how they had solved the same problem themselves. I hardly got time to check out other displays myself. Next time I will make sure I have someone to relieve me. I did manage to have a peek at the Daleks and saw a toddler hop out of a solar car, sights you can only see at a Maker Faire. This was southern hemispheres biggest and the buzz was amazing.

Maker Faire setup with lamps on
At the end of the day the organisers of the Maker Faire handed me a maker of merit badge which I am quite proud of and next year I plan to show up with even more projects.

Monday, October 10, 2016

ATM90E26 + ESP8266 Energy Monitoring

Before I commit a design to a PCB, I usually make a messy jumpers everywhere version on a breadboard. This is not always possible for a full complex design, often sections get committed to PCB and then modules find a home on the overall breadboard prototype.

This has been the fate of my ATM90E26 Breakout. I plan to eventually make it into a single board /accurate wifi enabled Energy Monitor. For now it is living next to a NodeMCU on a breadboard. The ATM90E26 has the flexibility to be accessed both over SPI and UART. However the SPI mode it supports is only Mode 3, which is an unsupported mode of the ESP8266 Arduino stack. So I ported my ATM90E26 Arduino interface code over to UART mode with CRC check and everything worked okay after a few days of head scratching. You can find it on the UART branch in github.

I would like to build a self-powered energy monitor, so I pulled out a venerable 7805 and added it to a half-wave rectifier from the 12V AC-AC transformer used for voltage waveform sampling. When I was using a full-wave rectifier in the past the overall DC voltage was too much for thr 7805 to regulate without a heatsink, however with the 1/2 wave version, the diode takes care of dropping half of the voltage leaving the 7805 functional without a massive heatsink.

I calibrated the set-up with some magic multipliers found using the datasheet, maths and my 116W calibration lamp and it all works like a charm as shown in the video below.

There seems to be some noise leakage onto the UART when AC signals are applied, I will attempt to rectify this with an optoisolator. However a simple reboot of the ESP8266 platform seems to quickly fix any software serial communication issues. Meanwhile I am putting it all together into a featherwing form factor for PCB manufacture.

Sunday, September 11, 2016

Hexiwear based GPS-AHRS for Nikon hotshoe

I have been working on the GPS-AHRS hotshoe for a while. The initial complete prototype was built around the Xadow platform. It is one of those continuous iteration projects, I wish someone puts me out of misery and brings out a COTS solution that is affordable soon.


I put the idea for the GPS-AHRS on the Hexiwear platform and received a free Hexiwear dev kit to built it with, a great deal. The Hexiwear has lots of toolchains for building projects with, including the Kinetis Design Studio from NXP and ARM MBed. This makes development on this platform a breeze. It also comes with a lot of sensors : barometer, gyro, accelerometer and magnetometer are all included. It has built in BLE for communications and a 16bit OLED screen. The only missing links are GPS, Nikon camera interface and a sensor fusion algorithm to obtain Euler angles/quarternions from raw motion data.

I already have working MBed code for sensor fusion and I have successfully tested reading all the motion sensors over I2C, so this should be easy to put together in the next few days.
I also compiled the stock firmware in KDS and did some small changes to show the Magnetometer data as part of the UI. This was relatively simple simply involved attaching a listener to one of the messages already being broadcast in the RTOS and a hacked up page to display the results. The results of this code can be seen below.


Tuesday, August 30, 2016

Counting Pulses with Maxim DS1682

I am often asked about interfacing the Energy Monitoring system with traditional spinning disk meters or blinking LED/Pulse type meters. For this application there used to be a very nice 1-wire pulse counter IC from Dallas/Maxim - DS2423. However it is end-of-life and no longer available. The next best option is the DS1682/83 series of RC oscillator based elapsed time recorders. The elapsed time function is not critical for pulse counting, however it is a nice feature. The lack of crystal makes is slightly inaccurate, but pretty robust and great for outdoor and industrial applications. It also has an EEPROM to store counted pulses, so the counts are retained across power cycles and the main MCU can sleep between long interval reads.


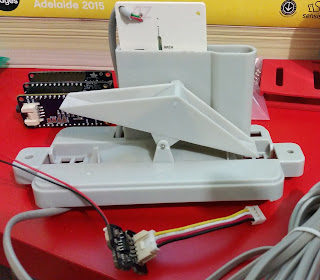
To test out this chips I built a Grove breakout which I am planning to use with a tipping bucket rain gauge. I have tested it on the ESP8266 with some basic Arduino I2C code and theres seems to be already existing Python code I can extend to use with my Udoo Neo Weather station.


Pulse counting can be easily done using a GPIO and an interrupt, however it requires the MCU to be constantly on. The DS1682 has a 17bit event counter giving it 131,072 total event counting ability before a reset is required.

Monday, August 29, 2016

AWS Summit Sydney 2016

Any web application that targets a mass market and wants scalability ends up in the cloud, rather than in an individual data centre. Of all the cloud providers the biggest currently is Amazon. After running the metromap application with AWS for a year mostly on a self-taught basis I realized that it was time to rub shoulders with some experts and possibly bring in some help.
Amazon was hosting a sort of marketing conference in Sydney and unlike the academic conferences I am used to attending this one was free. So I signed up for it with some work backing.
On arrival I walked into a massive Kogan keynote speech, it had all the pomp and fanfare of a boxing match or WWF rumble. Felt very American.

There were lots of AWS customer stories including one by Origin Energy about customer analysis. They have over 100million customer interactions. Traditional meters are read only 4 times a year, while Smart Meters produce data at a 30min interval. With this data Origin can offer a fixed bill plan using predictive analytics. The creation of this service started in stealth mode hotel wifi and personal CC, interesting collision of corporate culture with internet realities.

Moving data to and from the cloud was big sticking point as well and the AWS Snowball (80TB) was announced. I have recently ordered one, still waiting for it to turn up. Will write another article on this Data Exchange unit once I have had a real life play with it. Working at an aerial photography company I am used to huge amounts of data coming in from aircraft on similar hard drive units, but none of them feature 10GB ethernet and in transit encryption like the Snowball does.


There was a big focus on IoT capabilities in AWS as well including an Earth, Air, Fire and Water demo with Alexa playing stage manager.


I had a small blast from my CSIRO past. Peter Blaine had a talk about IMOS data sharing. 50Million NetCDF's are up in the cloud. The big challenge being the heterogeneity of the data. Apparently they have moved to the warehouse next to my old office and things are progressing okay. Even though CSIRO is rapidly shedding science staff, the engineering half is still alive and well.
On the display floor I managed to knock over a remote presence bot and chat to a lot of people in various booths, including Sumo Logic and Puppet which were particularly relevant to my application of image serving and service monitoring.
After a couple of days of hard conferencing and networking I managed to get in some R&R and learn the weird game of shuffleboard and enjoy some cocktails at the Little Darlin'. It was an exciting couple of days in Sydney and since then I have been putting my knowledge to good use. I will write up another post from my mass of notes collected during the summit.


Sunday, July 10, 2016

UDOO Neo Weather Station

I have been running my UDOO Neo solar powered in my shed for a while. I have been meaning to attach some bitcoin miners to it, just to support the network, since I am too far behind the curve with hardware to make any money off it. From what I read, the mining farms have taken over a whole hydroelectric dam somewhere in China.
Solar powered UDOO Neo
Anyway I finally got around to attaching the I2C bricks sensors that came with my UDOO Neo kit. There is an LM75 based temperature sensor and an MPL3115 based pressure/temperature sensor which can used an altimeter/barometer. These 2 sensors can be used to get some basic parameters for upload to Weather Underground or simply Thingspeak.

UDOO Neo with Sensor Bricks
The first set is grabbing the data from the sensors. The UDOO comes with modules to map the i2c devices to the linux device tree and fetch data from them by simple file reads, no I2C knowledge needed. I also found Tentacle Pi which is essentially an I2C multiple device driver library for Python. In my solution I ended up using a hybrid approach of direct i2c reads using Tentacle Pi and some /sys/ reads.
Results of i2c scan on channel 1
 The MPL3115 is read using the /sys/ method as shown in the gist below:
The LM75 is read using direct i2c and Tentacle Pi:
There is a few degrees of discrepancy between the 2 temperature readings, however I trust the temperature from the dedicated temperature sensor more. A simple test to show the data on console works fine.
Testing sensor bricks
From there it is a matter of pushing it out to Thingspeak to get a graph. I am looking at adding other sensors from the future bricks line or designing some myself using my I2C knowledge, particularly a wind speed sensor and a light sensor. The wind speed will help me determine if I can install a mini windmill generator and I can use the light data to correlate my solar panel output to solar intensity.

Wednesday, June 8, 2016

Kenya Trip 2016 - Magical Lamu

Arrving in Lamu on Flight 540
After about a week in Nairobi, Gichini and I decided to take a trip to Lamu to do get some R&R. Fly540 goes to Lamu almost every day and tickets are only about $100, the accommodation is cheap as well since the decline in the tourist trade due to the al shabab terrorist threat and abduction of westerners.As the article says Lamu is indeed a slice of paradise. Beautiful beaches, relaxed people and great food. I will try to keep this post low on words and let the pictures tell a story.

The Rasta men of Lamu
A lot of the people are ocean people. Fishing or transporting people in fibre glass boats with outboard motors or old school sailing dhows, a lot of which are made in Mozambique. One particular dhow was decked out with flags from multiple countries and had rastamen crewing it.
The beached dhow (made in Mozambique), prepping for a trip to Zanzibar
One of the downsides of the low tourist business is that we got approached by everybody who had something to sell. It made things affordable, but sometimes we overdid things a bit. On our walk from the airport ferry to the accommodation in Shela beach we met a guy who offered us fresh oysters. So we ended up with 4 dozen oysters for breakfast. The food overall was great, especially the fruits and seafood.
Oysters for breakfast

I took a day for a guided tour around Lamu old town. It has distinct Arab, Indian, Portuguese, Swahili sections. There are of course some modern areas as well. Building on an island is hard work, getting materials in and putting it together. A lot of the buildings are very old with marvellous hand crafted doors.
Old Wells

The Central Square
Some new buildings have replicated the old glamour and look like a set from a Medieval show (I am looking at you Game of Thrones).
New doors of old Lamu
The ocean seems to have crawled up and taken residence in the walls. Coral reefs have left their stamp.
Details in the coral lined walls
I took a day trip to a settlement from the 1500's with old walls and a secluded beach. Passed people from the Luo village quarrying limestone and coral by hand on the way.
Making charcoal the old school way
Quarrying for limestone
On the last day we took the boat back to the airport with friends we made on Shela beach. A glorious few days in an island paradise.I think I will go back as soon as I can.
On the boat back to the airport with Shay and Gichini
Beautiful isolated beaches on the Indian Ocean

Wednesday, May 18, 2016

More Energy monitoring - ATM90E26 Breakout

After designing and testing the ADE7763 based Energy Monitor Breakout Board, I started looking around for cheaper and more modern alternatives.I came across the Atmel ATM90E26 Smart Metering IC with dual communication options - UART/SPI and multiple metering modes (tamper proofing with current sensing on live and neutral). However the Evaluation Module (EVM) from Atmel is over-engineered and targeted at an enterprise audience. It is around $800 from Mouser Australia. I guess it needs to be so to comply with creepage/clearance requirements for handling 240V AC signals. This however puts it beyond the reach of a dabbler such as me.
Assembled ATM90E26 Reference design with low-voltage components

So I set about extracting the low-voltage only components from the Atmel Reference Design and placing them on a PCB. Atmel generously provided me with 3 sample IC's to go with my PCB's from OSHPark, thereby saving me around $750 in testing their IC.

Checking SPI mode - Mode 3 works
Then I went on the usual hunt for prior art in interfacing this code with a microcontroller and came across this post in /r/diyelectronics which interfaced the ATM90E26 to a Raspberry Pi. Ryzee sent me the code and assisted me in choosing the right SPI mode (mode 3 in this case) which lets a Teensy talk to the ATM90E26. The code is now available as an Arduino sketch.
ATM90E26 RMS Voltage mesurement test harness
I built a low-voltage test rig to see if the voltage ADC works okay and all seems to check out. Full blown Energy Measurement tests next. Meanwhile I have placed the couple of boards I have on Tindie to gauge interest for a larger batch. Let me know if you would like to test this modern Energy Monitor IC on the cheap.

Tuesday, April 5, 2016

Nikon Hotshoe IMU with Xadow Modules

Hotshoe GPS-IMU in enclosure
We take lots of oblique images from a helicopter for our high-resolution 3D modelling service - Aero3Dpro. While photogrammetry and aerotriangulation lets us establish the position and orientation of these photographs afterwards from a relatively poor initial GPS and no IMU, just after capture there is no indication how well an area is covered from different angles. This can be a pretty difficult proposition anyway, especially in the presence of narrow allies and tall buildings. However with a good initial GPS-IMU one could build a low resolution model of the city literally on the fly.

All the components that get packed into the GPS-IMU

So I set about building a system that fills this niche, a camera hotshoe mounted system with a reasonably accurate GPS and IMU. There are already a lot of existing Xadow modules which satisfy the requirements of the system. I just had to cook up a few more as described in a previous post to cater for the unique requirements for interfacing with the camera and logging the data.

  1. Xadow Barometer
  2. Xadow 9-DoF IMU (can be combined with 1 above in the new 10-DoF IMU)
  3. Xadow GPS  (the NMEA from the stock one does not agree with the Nikon so looking at a UBlox based version)
  4. Xadow OLED
  5. Xadow-M0 with MBed support
  6. SPI to Dual-UART with SC16IS752, this is necessary because the only available UART on the Xadow-M0 is consumed by the GPS. We need 2 more UART's to send data to BLE module and camera at 4800 Baud.
  7. Xadow BLE Module  
  8. Xadow SD for logging locally in case BLE connection is patchy or a non-Nikon camera is being used which does not allow geotagging over UART.
A lot can be done when all these modules come together to party, the mBed code is available here. The android app for receiving the GPS-IMU data over BLE and predicting the camera foot print is still in the works. If anyone wants to take the app development up as an excercise I can provide the source. In conclusion I must thank Kris Winer for excellent IMU test beds and sample codes which helped me get started down this path.
GPS-IMU on hotshoe mount
After all the electronics came the enclosure and hotshoe attachment system. I designed something rough in blender using a trace of the stacked PCB's and got it locally 3D printed by 3D Hubs and Andrew Karas. This mounts nicely on the hotshoe, but the openings for reset, USB and cable to camera are not neat, a more aligned box is in the works.


Tuesday, March 29, 2016

Kenya Trip 2016 - Bustling Nairobi

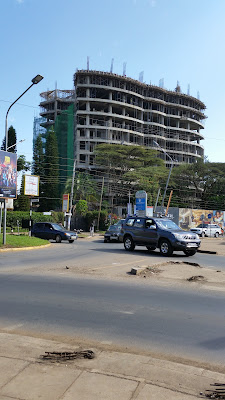
This year I decided to visit Nairobi and Kenya in general after a long hiatus. I was there last in 2009, just before my family moved back. Otherwise most of my formative years have been spent there and I have many fond memories. So this year I decided to bite the bullet and visit the long lost high school and family friends. Arriving in Nairobi and staying in Kilimani was an eye opener. So much has changed in half-a-dozen years. Kilimani used to be farmlands and forests, now it is crowded with high rise apartment buildings.
Had to work hard to get past the Askaris at M-Kopa
Several successful start-up are located here as well. I managed to visit M-Kopa (which manages to turn a profit while selling/loaning solar panels to the poorest people), BRCK which has built one of the worlds first completely sealed and mostly waterproof educational tablets thanks to Qi chargers.
Apartments are being built everywhere in Nairboi
The top floor of the same building houses iHub, a co-working space allowing freelancers and start-ups looking for contract workers to meet-up and work together. The view from iHub is amazing as well.
The view of Nairobi from iHub, with a little bit of the human element
Gearbox is downstairs from iHub, it is geared towards hardware start-ups with soldering microscopes, lathes, CNC mills and of course a mandatory 3D printer. It is run by former theater props maker, skilled in wood and other materials as well.

My former high school friends have got their university educations in country or overseas and are itching to move forward with business plans. There is an IBM research lab and a Bitcoin start-up called BitPesa working in the remittances arena. I took UberX everywhere and stayed at an AirBnB with fibre access (albeit intermittent power). It felt like being in a hybrid world.
Three men on a pole - standard overhead cable fixing practice
Overall it was a great eye opener in the way Nairobi has changed in the last decade. A place to keep on the radar for future movers and shakers.