Saturday, January 30, 2016

Getting started with CC3200 + Energia

Another month another Seeedstudio recipe contest. This time the star ingredient is the Texas Instruments CC3200. The rewards initially were quite lucrative as well, a chance to showcase my project at the TI booth in CES2016. However reality got in the way and I did not receive the boards from China and get my project together till CES madness was long over.
I had proposed a GPS-AHRS like solution I have developed using the Xadow M0 module. However this did not survive meeting the real hardware. Even though the Cortex-M4 on the CC3200 is more than capable of handling the sensor fusion I could not get my Arduino code ported to Energia. I ended up building a war driving tool with wifi scanner, gps and microsd logging. You can read about it in all the gory detail here on the Seeedstudio recipe page.

Overall coming to the CC3200 from the ESP8266 platform was quite pleasant. There will be a price shock for those actually buying the dev board, but I got mine for free as part of my entry so that removed one hurdle. The Cortex-M4 processor and multi-threading are quite powerful. However Energia could use a merge back into the main Arduino project using the platforms mechanism. It makes it easier on tinkerers like me who constantly switch between NodeMCU, Arduino, Teensy, Navspark, Udoo Neo and now the CC3200.

Wednesday, January 20, 2016

Extending Energy monitoring - ADS1115 Grove module and ADS1115 Featherwing


After selling a few kits and populated boards of the NodeMCU Energy Monitor on Tindie, I started receiving feedback from people in the real world using my design. One of the main requests was the ability to support more channels, the other was miniaturisation suitable for fitting in 1 or 2 unit DIN Rail enclosures.

I addressed the request for channels by developing my own energy monitoring specific ADS1115 breakout. In addition to the core IC it includes 3.5mm stereo sockets for connecting the popular YHDC CT sensor and a couple of Grove connectors for chaining multiple boards together. Using this mechanism and the core NodeMCU energy monitor, one can monitor upto 7 current channels.

The issue of miniaturization is adressed by choosing a smaller form factor and feature rich ESP8266 breakout, namely the Adafruit feather. As a side effect we gain access to all the other boards using the feather form factor and all the other stackable featherwings.

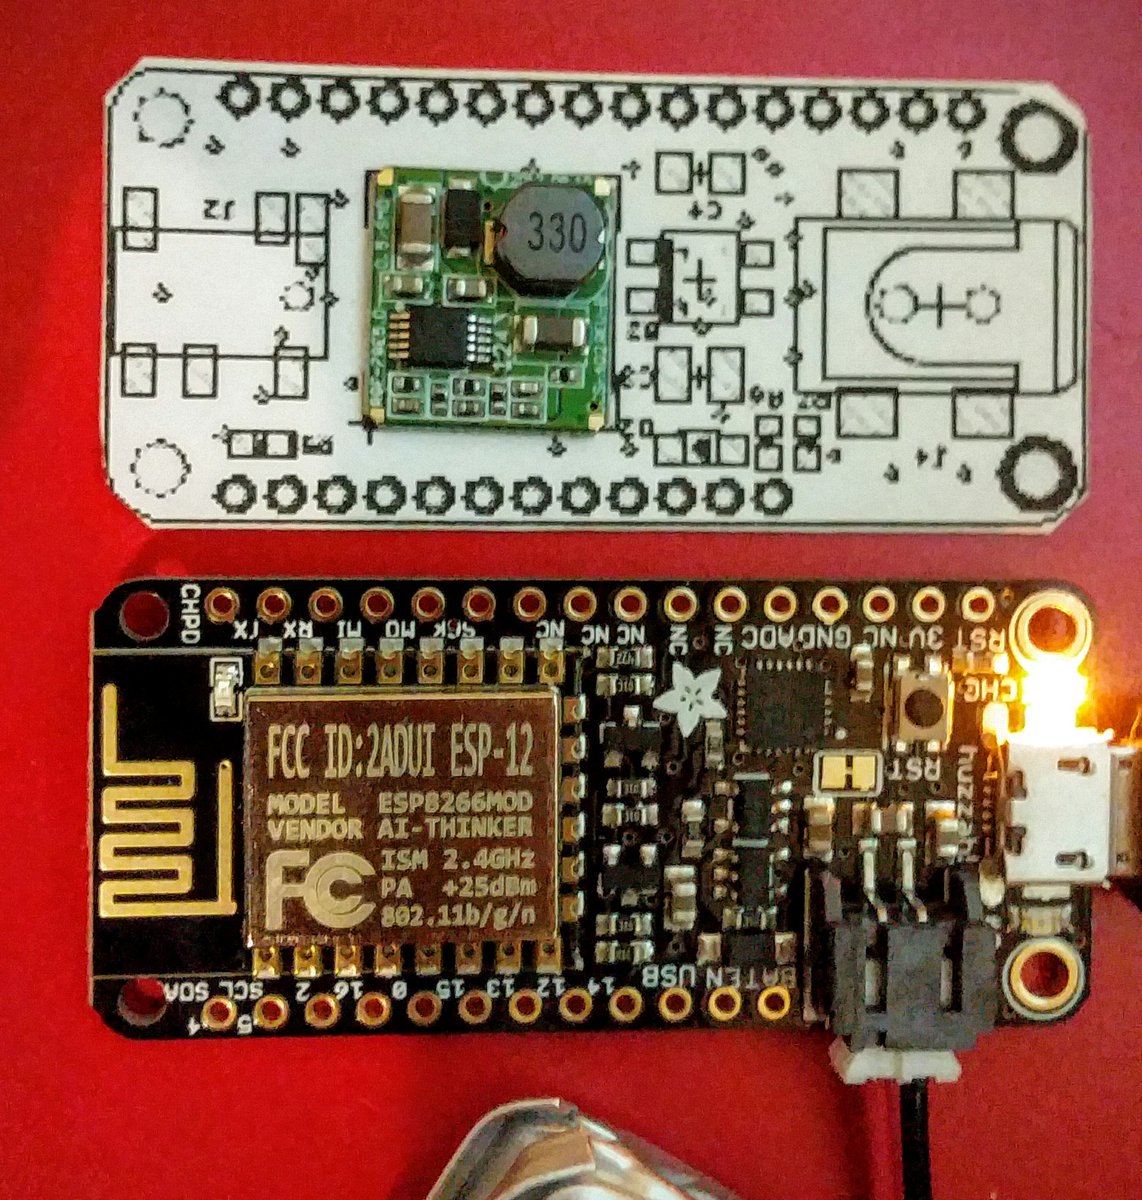
During the design of the Energy Monitor Featherwing I integrated the ADS1115 onto the same board instead of using a breakout  (switched to 0603 parts to make it more compact) and used an SMD version of the Recom 5V Buck converter.

The featherwing can be mounted with stackable connectors under the Adafruit feather. Leaving the top free for display OLED for realtime power display or just weather or bitcoin prices vs energy usage.

Sunday, January 10, 2016

Leatherworking and mongol armor from coke cans

We regularly go to the Medieval fair in the Adelaide hills. Last year I tried my hand at metal working and came up with a great helm and a sort of crusader costume. This year I started playing Magic, like many nerds I played it while young, only recently have I found time (and money) to get back into it. I took inspiration Mardu Skullhunter on cover of B/W warriors event deck. This armor is sort of in the Mongol style if the very well funded Netflix show Marco Polo and wikipaedia are to be believed. The upshot was that I had to learn leatherworking and make a lamellar armor which would stand up for a whole day of walking through crowds and kids.
With the aim set I decied to do it on the cheap. I have made things out of coke cans before. The aluminium there is really easy to work with and readily available. I gathered raw materials for 6 months from Coke and assorted soft drink cans from colleagues. Finally I cutting them up into little pieces using stress fracturing and sealed all the edges by folding them in.

Affordable leather was surprisingly easy to get. I picked up a 16 squarefoot sheet of treated cow hide, just the right colour from the local leather shop - D.S. Horne for $50. They also have a good selection of hand leatherworking tools. This cheap leather is not armor thickness, so I backed it up with some craft foam glued and then stitched on.  The stitching proved pretty hard so I got assistance from the local upholstery shop. When you are rushing to make complex armor piece by piece in a week, you should use any help available.


The next stage was stiching on all the coke can lamella onto the leather and foam backing and making some eyelets for attaching all the pieces together. I used any left over leather to make straps for attaching sections.

Next came the accesories, what is a skull hunter without any skulls ? So I ordered a miniature skull mould from eBay and my friendly sculptor and fellow armor maker at Pointy Ears Creative Studio made a few expandable foam and plaster skulls for me.


It was all done just on time. The glue was still drying on my skull belt when we rolled into the fair. A whole day of amazing fun followed with lots of pictures being taken through out the day.

 
We even went to local pub in character and took some more photos, they let my coke can morning star through as well. By the end of the adventure some of the thin lamella got bent and the whole armor will need some repair before the next outing. I am thinking of laser cutting some shiny decorative lamella if possible. More notes on that this year.

Wednesday, January 6, 2016

The shed solar project - with UDOO Neo

A while ago I was planning to power my external work area from solar power. So I went ahead and orderer a couple of 100W solar panels from China. They cost $100 including the charge controller with another $100 for FedEx shipping. They have served me well so far, should have ordered some more. They have been keeping a 130Ah SLA battery fully topped up for a couple of years now. I never got around to acquiring an inverter, so my soldering stations are not yet solar powered.

After accumulating electronics parts, devboards and recycling TV parts for a year I had enough bit floating around that I had to construct a shed to put them in. At the very far end of the backyard, away from the house. It is a major hassle deploying electricity to the shed. So I decided to take the panels, which were languishing against a pole in the back verandah, and deploy them on the shed roof.


I installed the PID charge controller and massive battery on the inside together with some LED bar lights, suitably coated in clear silcone for weather proofing. Ultimately there are plans to build an MPPT controller and add some monitoring for solar energy generation as well as add some bitcoin miners for network support. The Carinya brackets I used to install the panels cost as much as single panel, next time better order brackets as well.

The LED's are controlled by a small $2 RF remote with a dimming and flashing function. A bit of an overkill but it makes for great raves in the shed. Being basically the large galvanized steel box the shed has very good RF shielding and an external weather proof antenna will be required for any sensor install and wifi connectivity. So I have hooked up a TPlink external antenna and placed a Udoo Neo with mods for an external antenna there, more Udoo + shed related posts to follow.